Showing posts with label crafty. Show all posts

Making A Printable With PicMonkey: A Tutorial


Sometimes, you need to fill a frame and have nothing to fill it with.  It's these times that I pop over to Picmonkey, (the easiest photo editing software online), and make one.  Picmonkey is super simple to use and there is no software you need to download.  

First Things First


Picmonkey is probably one of the easiest photo editing software you can find online.  Yes, it is slightly limited.  And, NO, it is not just like Photoshop.  Well, it is sort of like Photoshop - just on a simpler scale.  

This is the front page of Picmonkey.  From here, you can edit a photo that is already stored on your computer or you can make a collage based on many of Pimonkey's collage templates.  For now, we will just talk about the 'Edit A Photo' option.



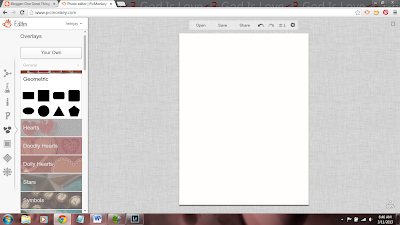
After clicking 'edit a photo', you will be prompted to find the photo you want to edit in your picture folders on your computer.  For this, pull up a blank picture.  If you don't have a blank picture, you can upload any picture and use the overlays on the left of your screen to over lay a shape onto your picture that can then be colored to match whatever background you wish to have.  The overlay selection will be the 5th option down from the editing portion of Picmonkey.


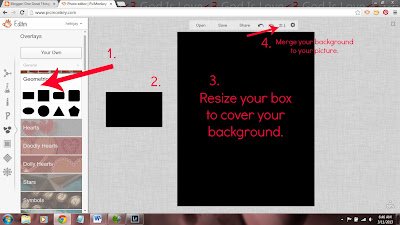
Select your overlay shape (1), re-size it to fit your picture (2 & 3) and merge the layers (4).  The default color to overlays is black.  To change the color, just select or highlight the shape, then change the color from the color menu that will display.  


Now, comes the fun part.  To add text to your design, click the 'P' on the far left.  You can choose from several different fonts and also re-size your text by adjusting the sliders.  For this tutorial, we will be doing a basic printable.



Once you have the design you want, click 'save' at the top.  That's it!  Super easy, huh?

Happy Printing! 


Oh!  I almost forgot!  If you want this printable but don't feel like popping over to PicMonkey to make you one, just download mine.  It's FREE!  Simply click on the picture and right click to save to your computer.  Couldn't be simpler!

Candle In A Cup


What else is swankier than a candle in pretty little teacup?  I can't think of anything.  Well, not right now anyway.

What you need

Teacups
Wicks - start out with 6 inch wicks
Wax
Skewers
Extra string

How's It's Done

Melt wax over low to meadium low heat.  Put a small amount in the bottom of your teacup and place wick on top and hold to secure.  Be sure to place the wick in the center of the cup as much as possible.

Take your skewer and wind the top portion of the wick around it.  This will preent your wick from falling to the side during your pour.  

Pour in the melted wax slowly and stop about 1/2 from the top.  After your wax sets it may be necessary to add an additional layer of way to the top.  Just a smidge will do.


Dyed Clothespins


So, I saw a picture not too long ago, I'm sure it was on Pinterest, but this picture was of dyed clothespins.  They were adorable!! Which got me thinking of all the wonderful crafty things I could do with them...not to mention, they're for sale all over the place for more money than I'm willing to pay, so why not create them instead?!

I set out on a mission to find supplies.  I'd read several different methods to dying your clothespins; Easter egg dye, food coloring & vinegar, Rit dye, etc.  It's too late for Easter dye and I didn't want to purchase anything (gotta save every dime you can, you know?) so I opted for the food coloring and vinegar.

Americolor Soft Gel Paste Student Kit- Culinary Academy 1st Choice!

Here's the food coloring I used.  I wanted to use liquid coloring but had none in the pantry...oh well!

I got this from Amazon, it's Americolor Soft Gel Paste Student Kit- Culinary Academy 1st Choice!.  I think it turned out well...I did add vinegar and water to a pot (although I didn't measure) and heated it up a little.  I'd say start with 1/4 cup of vinegar, 1/4 cup of water and little bit of the color.  Heat it up - not too hot, and pour over clothespins.


 Unfortunately, I don't have pictures of this process.  I have got to start remembering to take pictures when the crafty bug hits me!  ;)

I let mine soak for about 15 minutes but you can leave yours in longer if want a darker color.  Also, using the vinegar will make the metal claspy thing to look a little more worn and vintage'y.  So now I have a ton of very swanky clothespins ... what to do, what to do!  :)

I hope this gives you great inspiration to get crafty!  :)


Here's a couple of projects you can make with your dyed clothespins!